Thursday, December 15, 2011

Open House & Xmas Sale

You are invited to our Xmas Open House


Join us this Sunday December 18th for our annual "Open House". We will have special hours 12pm-5pm. Free demo's. Hourly beady give-a-ways pulled from our stocking. Red Velvet cake and drinks. Print and bring the coupon below and take an extra 10% off your purchases.

40% Off...Sunday only! Open your email, Print and bring your coupon to get 40% off on your purchase. You must spend at least $40.00 before tax. (offer excludes sterling silver, showcase items and chain).

Can't make it on Sunday. From Dec 18 until xmas you can still enjoy a 30% discount if you spend a minimum of $30.00 (see details in your email)

Monday, November 21, 2011

November Class Schedule (2011) & Pudgy News

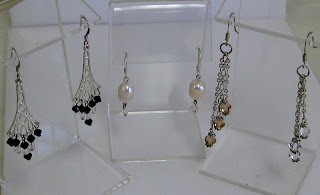
Pudgy Beads just released a Free video. We will be presenting a series of free classes on youtube and on our website and facebook page. Our first video "Waterfall Earrings" are absolutely beautiful and simple to make. If you would like to purchase materials or a kit for this project please contact the store or you can order through our website at http://www.pudgybeads.com/
Enjoy!
"WaterFall Earring Project" 


Pudgy Beads Annual Black Friday Sale
30% off
On the entire store. Discount does not include Sterling Silver, Gold-filled, Chain or Clasps. Must spend a minimum of $30.00 to receive the 30% discount. Store opens as usual at 11am.
Can't make it on Friday, use your coupon for 25% off ( with $25.00 purchase) during the following week. (Nov 26 - Dec. 3)


NOVEMBER/DECEMBER CLASSES

RING TRIO - Wire crazy, You learned the hoops, let's move on to rings!!! Quick, easy and a simple way to kick off your creativity, this ring trio can be as simple or as intricate as you like. We will be manipulating wire to form the rings and adding the beads of your choice. Bring your creative ideas for this class to create great inexpensive gifts this holiday season. Class Fee $35.00, Materials not included. Dates: 11/26, 12:30pm – 4:pm


BASIC BEADING WORKSHOP I/Bracelet This is our basic beginner’s stringing workshop.  In this class, you will learn how to choose and attach clasps. You will learn about the different stringing materials and tools required to design with. You will leave with a finished bracelet. Class Fee: $15.00, Materials not included. (Kits Priced from $7.00- $25.00) Sunday 11/27/11, 1:00pm – 3:00pm


BASIC BEADING WORKSHOP 2/EARRINGS   So you’ve learned the basics of making necklaces and bracelets, and now you’d love earrings to go with all your new creations. In this class, you’ll learn all you need to know about constructing earrings, including making perfect loops.  An earring class wouldn’t be complete without making chandelier earrings.  You will finish at least three pairs. Class Fee $25.00, Materials not included. (KIT PRICES FROM $15 - $30.00). Dates: 12/4/11, 1:00pm – 3pm 


SOLDERING WORKSHOP I/Bracelet Learning to solder can open up a whole new world of jewelry making to you. Though the process is fairly simple it does take practice. In this class you will be learn to solder Sterling or Copper square rings then fabricate them into a bracelet. We will spend some time on safety aspects and learning how to handle and adjust the flame. Class Fee: $60.00, Materials not included. Dates:Saturday 12/10,12:30pm – 4:00pm 


STAMPING & FORGING - In this class you will learn how to stamp metal shapes with words and texture. We will cover cutting your own shapes from metal sheet and using heat, patina or Alcohol inks to color your creations. We will show you how to use a dapping block to add curves to your forms and how to create perfect holes in your project. We will also show you how to create cold connections without an expensive rivet machine or tool. This is definitely a fun and informative class. Class Fee $45.00 Saturday 12/11,1pm-3pm.


Monday, October 10, 2011

Class Schedule, October 2011 - Pudgy News


Basic Beading Workshop
Wire Wrap/Rosary Wrap

If you are new to working with wire then this class is for you. You will learn everything there is to know about making and perfecting the rosary wrap. The rosary wrap is made with wire that you use to secure your beads or charms onto a chain or finding. You will perfect this technique by connecting your rosary wraps into chain, making a necklace and a pair of earrings. Class Fee $25.00, Dates: Saturday October 15, 1:00pm – 3:00pm, Materials not included. (KIT PRICES FROM $15-$30.00).

Crochet Necklace


To make this beautiful necklace or bracelet you will need to know how to chain stitch. You will be using the chain stitch with wire for this project. You will incorporate the beads of your choice into your design. This is Perfect one for holiday gifts. Class Fee: $45.00, Date: Sunday October 16 pm, 1:00pm-3:00pm. Materials not included.


HOOP EARRINGS 


Hoop earrings are all the rage. This is a beginners wire project. You will be forming your own wire hoops so you can make them any size you want. You will be wrapping crystals or beads of your choice around your hoops to create stunning earrings. You will even get a little fabricating experience by forming and hammering the ends of your earrings..FUN!  Class Fee: $35.00, Date: Sunday October 23pm, 1:00pm – 3pm, Materials not included.


Copper Clay Workshop


Discover the new and exciting world of Copper clay by making your own pendant and earrings! If you have wanted to explore Precious Metal Clay then this class is for you. The same skills you learn can be applied to PMC. Copper clay is not only beautiful but inexpensive especially when you compare it to Precious (silver) metal clay. Copper clay can be molded, shaped, stamped, carved and cut to create original and unique pendants. Come prepared to play with clay. Class Fee: $60.00, Date: Saturday October 29 pm, 12:30pm-4:00pm. Materials not included


Pudgy News/On sale

Autumn is finally here and this time of year is a great time for beading. I do more beading during the winter months than I do in summer. A favorite way to spend my evening after work is to snuggle up with my bead project and a cup of tea. I’m in full gear now and I’m making my holiday gifts. I’ve settled on what I’m making and pretty much gotten all of them laid out. Now the fun begins.

Please join us for a trunk show with “Fusion Glass” On October 22nd and 23rd . Hours: 11am to 5pm Saturday and 12pm to 4pm Sunday. For those of you unfamiliar with Fusion Glass They produce beautiful Dichroic glass beads and jewelry. Their work is absolutely amazing and their prices are the best around since they manufacture the product themselves. To see their beautiful work visit their website at http://www.fusionglassco.com/

On Sale!!!
Jewelry cleaning cloths – $1.50 each  6” x 5 ½”

Velvet covered padded displays. They measure 4 ¼” wide and  8 1/8” tall. We have them for $3.00 and they are available in black and white.


Holiday Shows to Sell
If you sell your jewelry this is definitely the right time to sell. Pre holiday sales during the next couple of months should be brisk, especially for handcrafted items. Here are some show leads to get you selling. Most of these have deadlines to apply so get your application in by the deadlines.

Show and Sell Art Affair
Sunday November 13, 2011
Signal Hill Park Community Center
1780 East Hill St.,
Signal Hill, CA
Deadline for applications is Oct 26th
For more info contact: fosha@verizon.net or call 562-822-5260

Farmers Market
Airport Business Park
5000 E. Spring St.
Long Beach, CA 90815


I think this is the best Farmers Market in Long Beach. Located at Spring and Clark. This market has Pony Rides, Petting Zoo, magicians, jugglers, stiltwalkers, rides and many activities. Hours are 8:30 am to 2:00 pm every Sunday. Parking and free admission. For vendor info contact: fer1681@aol.com  or call 818-859-2001.

Wednesday, September 7, 2011

September Class Schedule (2011) & Pudgy News

BASIC BEADING WORKSHOP - BRACELET - This is our basic beginner’s stringing workshop. In this class, you will learn how to choose and attach clasps. You will learn about the different stringing materials and tools required to design with. You will leave with a finished bracelet. Materials not included. (Kits Priced from $7.00- $25.00. Saturday, Sept. 10th, 1pm-3pm.
SOLDERING WORKSHOP 1/BRACELET - Learning to solder can open up a whole new world of jewelry making to you. Though the process is fairly simple it does take practice. In this class you will be learn to solder Sterling or Copper square rings then fabricate them into a bracelet. We will spend some time on safety aspects and learning how to handle and adjust the flame. Class Fee: $65.00, Materials not included. September 17, 12:30pm – 4:00pm


Crochet wire cuff- If you have never worked with wire before then this class is for you. You will not only learn how to frame a wire cuff and you will also learn how to design a pattern around your frame with a smaller gauge wire. You will decide just how much wire or beads/crystals you want on your cuff. After learning the basics in this class you will be able to alter it to meed the needs of your prefered art form. (YOU MUST KNOW HOW TO DO A SINGLE CROCHET OR CHAIN STITCH).Class Fee: $40.00, Materials not included. September 24, 1pm – 3:30pm


Earring Trio - These three pairs of earrings would make great stuffing stuffers. You will use these wire designs over and over, especially the chandelier findings. You will learn trade secrets for making perfect bends in your wire without nicking or marring it. If you are new to working with wire you will be able to make these. I you are experienced with wire you will definitely learn some new techniques. Class Fee: $40.00 October 1, 1pm-3:30

PEARL KNOTTING - You will learn how to complete an elegant pearl necklace using the traditional European method of knotting between each pearl, which is an elegant way to protect the pearls or beads from rubbing each other and is a safeguard against loss if the strand breaks. You will master the use of finishing with French Bullion, which is found on most “better” pearl strands and attach the clasp. Materials not included. Class Fee: $25.00 October 8, 1pm-3pm .


Monday, August 29, 2011

Monday, June 13, 2011

Class Schedule,June 2011 & Pudgy News

This weekend June 18 join us for a beginners workshop. sharpen up your crimping skills and bring any designing questions you might have to this class.
BASIC BEADING WORKSHOP - BRACELET - This is our basic beginner’s stringing workshop. In this class, you will learn how to choose and attach clasps. You will learn about the different stringing materials and tools required to design with. You will leave with a finished bracelet. Materials not included. (Kits Priced from $7.00- $25.00. Saturday, June 18, 1pm-3pm.


STAMPING & FORGING - In this class you will learn how to stamp metal shapes with words and texture. We will cover cutting your own shapes from metal sheet and using heat or a patina to color your creations. We will show you how to use a dapping block to add curves to your forms. This is definitely a fun and informative class. Class Fee $45.00 Saturday June 25th,1pm-3pm.

KUMIHIMO (JAPANESE BRAIDING) -
Come learn the age-old Japanese art of Kumihimo. You will learn this interesting and versitile braiding technique by interlacing strands of cords and ribbons. You can use your creations to create a bracelet neclace or purse handle. Embellishing it with charms or beads can make it even more special. (you may not finish the project in the class but you will have enough knowledge to finish at home) Class Fee: $35.00, Sunday June 26, 1pm – 3:00pm.


PEARL KNOTTING - You will learn how to complete an elegant pearl necklace using the traditional European method of knotting between each pearl, which is an elegant way to protect the pearls or beads from rubbing each other and is a safeguard against loss if the strand breaks. You will master the use of finishing with French Bullion, which is found on most “better” pearl strands and attach the clasp. Materials not included. Class Fee: $25.00 July2, 1pm-3pm .


BRIDAL SHOWS- A GREAT WAY TO SELL YOUR JEWLERY!
Bridal shows are different than "regular" shows . If you are thinking of doing a bridal show, here are some things to consider before jumping onboard. First, brides are planning in advance. Usually when they attend a Bridal show, the wedding isn't happening for at least six months. The brides are usually working on setting their budgets, themes, colors, and all the big picture stuff.


This means they probably aren't buying jewelry on the day of the show. They probably aren't even ready to think about it yet. They won't be ready to pick out jewelry until well after the dresses have been selected, and possibly not until 2-4 weeks before the wedding. So, don't expect to sell much, if anything, on the day of the show.

For your show samples have different colors and think about simple, complex, formal and casual. Also consider the mothers of the bride and groom and the flower girls, make sure you have some designs for them.

What you want to get out of a bridal show are future sales. So hand out lots of cards. Have a sign up book to get names and emails, plus wedding dates and colors if they know them, so you can send information about new pieces when they are ready to think about jewelry. Talk to the bride, her mother, her friend, her little sister - they will all likely be participating in the process and you want them to remember you.

Also don't feel shy about promoting yourself to other vendors. Find the wedding planners and bridal shops and make sure they see your work, as they are most likely the ones who will be helping the bride finalize their wardrobe details. Perhaps the cake people too, since they often are pretty well tied in to the network and are in a good position to give referrals.
If you can afford it consider a brochure to describe your services. Do you do custom work? Do you make kits for bridal parties who want to make their own jewelry, or will you do a home party to help the girls make their own? Do you have any jewelry to offer the men?

Carefully weigh the cost of doing the show to consider if it’s worth it for you. Remember this is an investment in growing your business. Good Luck!

Saturday, April 9, 2011

Class Schedule April 2011 & Pudgy News

BASIC BEADING WORKSHOP - BRACELET - This is our basic beginner’s stringing workshop. In this class, you will learn how to choose and attach clasps. You will learn about the different stringing materials and tools required to design with. You will leave with a finished bracelet. Materials not included. (Kits Priced from $7.00- $25.00. Saturday, April 16, 1pm-3pm.


BASIC WIREWRAP - In this class you will learn basic wire wrapping skills. You will use wire to create a structural frame or saddle around a glass or stone cabochon. The frame will securely hold the piece and convert it into a pendant. This class is a must for enhancing your beading repertoire. Class Fee: $35.00, Sunday April 17, 1:00pm – 3pm. Materials not included.


Pudgynews And Views

If you're like me I'm happy it's finally spring although the first days of April are very winter like, I'm hoping for signs of spring soon. 

Thank you to all who attended our "Tucson Sale". It was a huge success. We will continue to bring you bead show prices at our store.

We just struck up a deal with one of the largest pearl dealers in the business and although we have great prices and selection on our freshwater pearls you can expect to see even more selection and as always at unbelievable prices.

Please note...because of this months show schedule we have a limited amount of classes. Stay tuned for next months class schedule.

Pudgy Beads just got in new basemetal chain in four colors Sterling Silver, Black Ox, Gold and Antique Brass. To introduce it to you..we are offering it for $1.00 a foot...yes you read it right. We already have the best prices on chain in the the city or at the shows and for this month only you can purchase the new chain styles for half price..what a deal!!!


Creative Ways To Display Your Jewelry At Craft Shows
How you display your jewelry at a show can have a tremendous impact on your sales. Great jewelry presented poorly will give an overall poor impression of what you are offering. On the other hand you don’t have to get totally carried away in trying to create a display that overpowers your jewelry either. Clutter creates confusion in the customer’s mind and you definitely will not make as many sales…remember simple and tasteful is usually better.

Create a mood with your display and whatever you choose be consistent throughout your booth. For example if your jewelry is created with natural gemstones. Use natural fixtures like driftwood, rocks or sand. If your jewelry is vintage use a few antique items like antique photos or vintage hatboxes or even hats. A visit to second hand shops should reward you with some great props for your booth

Remember to stay with a limited color scheme don’t use multiple colors. Doing so will not only weaken your overall concept and image but take the focus from your jewelry in a negative way.

Here are some fresh creative ideas to use for your next show. Use them and see your sales soar…Good Luck at your next show!
1. Find an old frame at a thrift store. Staple wire mesh from your local hardware store and staple it to the back. Use a can of spray paint in your color scheme to spray the entire display. You can use this display on an easel or make smaller ones for your table and support it with bricks. For a table display I added a slat of wood to the back of the frame and used a hinge to support it.

2. Use a natural or painted wood shutter to display your earrings if you have them on cards. You can make your own cards and put a crease in the top to fold over the shutter, or if you use already made cards use a display pin to secure your carded earrings.

3. Try displaying your necklaces and bracelets on some inexpensive glass gems sold in craft stores or better yet collect some sand and seashells from the beach or some rocks from your local hardware store.

4. From a thrift store or yard sale buy a small Christmas tree and hang your necklaces and bracelets from it. You can spray it in your color theme or buy one in silver or gold.

5. Use some pillows. How about some rich Velvet pillows to strap some of your necklaces or bracelets over.

6. From a thrift store find a mirrored vanity tray. Use it to display a few chosen pieces on. If your jewelry has a vintage look use some old or new tea stained handkerchiefs and new or vintage gloves to give your display class and a vintage feel. , While you are at it add a black and white photo in an old frame.

7. Look no further than your kitchen and choose some unique bowls and saucers at to drape your jewelry. If you add some rocks or sand to the containers you can add some earrings or pins to make an interesting display.

These are just a few ideas. Use your imagination and create beautiful effective displays to not only compliment your jewelry but to sell it.


Wire Part 2

If you use wire in your jewelry, the more you know the better your projects will turn out. Check out some basics below.

Wire Shapes

The most common shapes of wire are round, half-round and square. The most popular of these shapes is round, although for wire wrapping the square and half round are used most often.

Wire Sizes

Wire is sized by its thickness. If you want to hang charms from a chain, the gauge of your wire should be thick enough so that the charms don't twist and bend. If they do, they may eventually break off. 24 and 26 gauge are relatively thin and are used primarily for wire crochet or coiling. 20 and 22 gauge wire is used most often and will suffice for most wire work like looping your beads or components together.18 and 16 gauge is a thick gauge should be used when you have heavy beads or pendants or when you are creating Hand-crafted clasps.

The most popular wire gauges are 14-guage to 26-guage. Remember the thicker the wire the smaller the gauge number. 14-gauge wire is thicker than 18-gauge wire and 26-gauge wire is thinner than 24 gauge. In countries other than the U.S. wire is sold in diameters measured in millimeters. The chart below gives you a gauge to diameter(approx) conversion. Popular wire sizes are 18-gauge to 22-gauge.

Gauge  Chart with Diameter size

26gauge = .4mm                24gauge = .5mm

22gauge = .6mm                20gauge =  .8mm

18gauge = 1mm                 16gauge =  1.3mm

14gauge = 1.6mm


What is Wire temper and why it is important to you!

The temper of wire refers to the hardness or softness of the wire. Softer wire is easier to work with and gets harder as you work with it. Wire is sold in three tempers: dead-soft, half-hard and full-hard.

Which kind of wire temper do I want to use?

Dead-soft wire has been heated or annealed to make it more malleable and easy to work with. It will bend and coil without difficulty. You can create your piece and work harden the wire as you go or at the end in a tumbler.

Half-hard wire is harder to work with then dead-soft, but some wire jewelry makers prefer to use it. I usually let the project I’m working on help me determine the size or gauge of the wire. If I’m using a thicker gauge like 16 or 18 I prefer dead soft because its easier to work with. If I’m wire wrapping and using a thinner gauge like 20 or 22 I will most often will use half-hard. If you ever find yourself with only dead soft wire, remember you can work harden it by pulling on it, oftentimes just forming it into the shape you want it in is enough to harden soft wire.

Full-hard wire is wire that does not bend easily and is not generally used for wire jewelry making. You can use this type of wire to make spring back or hat pins.

We hope our articles are helping you to become a more knowledgeable jewelry maker. If you have any questions please send them to info@pudgybeads.com and we will answer it in our next newsletter or on our facebook page. Please be our friend on this blog and on facebook.

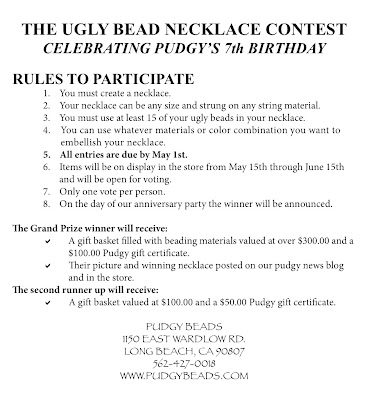
The Ugly Bead Necklace Contest


Tuesday, March 1, 2011

Class Schedule March 2011 & Pudgy News


BASIC BEADING WORKSHOP 1 - BRACELET - This is our basic beginner’s stringing workshop. In this class, you will learn how to choose and attach clasps. You will learn about the different stringing materials and tools required to design with. You will leave with a finished bracelet. Materials not included. (Kits Priced from $7.00- $25.00. Saturday, March 5, 1pm-3pm.


SOLDERING WORKSHOP 1/BRACELET - Learning to solder can open up a whole new world of jewelry making to you. Though the process is fairly simple it does take practice. In this class you will be learn to solder Sterling or Copper square rings then fabricate them into a bracelet. We will spend some time on safety aspects and learning how to handle and adjust the flame. Class Fee: $65.00, Materials not included. Dates: 3/12/10, 12:30pm – 4:00pm 


PMC WORKSHOP 2 - This class is for those who have already taken PMC 1. Taking this class will elevate your knowledge or working with PMC. You will learn how to create and embellish hollow beads and also various methods to set stones into PMC. Class Materials not included. Class Fee $65.00, Dates: 3/26 12:00pm – 4:00pm


WIREWRAP COMPONENTS - This class is for anyone who wants to take their wirewrap and fabricating skills to another level. You can even take this one if you are a beginner to wirewrapping. We will be making components and connecting them into a necklace. We'll be working with a large gauge of aluminum wire to make your components easier to construct. We will also fabricate your pieces using a bench block and a ball peen hammer. This class is perfect to make the long necklaces that so in style now. Class Materials not included. Class Fee $45.00, March 26, 1pm-3pm


BASIC PEYOTE (BASIC STITCH) In this fundamental stitch class you will master even count peyote. You will create a tubular bracelet and learn about thread tension. To give your finished bracelet a unique look you will use two colors of 6/0 or 8/0 seed beads. This is an intermediate class and it requires that you already know basic peyote. Note: This is a technique class and you may not finish this project during the class. Class Fee: $ 35.00 – 2 hour class Materials not included. March 20, 12pm-4pm


Show Listings
Show season is upon us and if you make your jewelry to make extra money the following show listings can help you get a jump start. We have included some links and referrals. Be sure to do your research. It’s a good idea to visit the shows before you do them..but sometimes that’s impossible unless you want to your homework for the next time that promoter is offering a show. If you need more tips on doing shows you can refer to our book “You Made It Now Sell It”.


April 30 & May 1   San Diego, California   Mission Federal ArtWalk   Deadline: January 14
For more info: http://www.missionfederalartwalk.org/

Scottsdale Arts Festival    March 11-13    Scottsdale, Arizona     Deadline: October 12, 2010
For more info: http://www.scottsdaleartsfestival.org/

Lake Tahoe Festival of the Arts  August 20 & 21   Lake Tahoe, California   Deadline: March 1

Malibu Arts Festival, Malibu Civic Center 23555 Civic Center Way   Application Deadline: 6/30/11
Show Dates: 7/30/11 - 7/31/11

San Diego Holiday Art Festival 2011   Del Mar Fairgrounds   California   Application Deadline: 4/30/11
Show Dates: 12/2/11 - 12/4/11

Sugar Plum Arts & Crafts Festival, Buena Park Downtown Mall   04/14/11 to 04/17/11 http://www.sugarplumcrafts.com/dates.html

The Long Beach Bike Festival & Tour of Long Beach, May 13-14, 2011 for vendor application http://www.dlba.org/uploads/Special_Events/Bike_Festival/Vendor%20Participation%20Form_2011.pdf

Although some of the application deadlines are passed you can contact the promoter and get on their wait list is you are interested in a particular show. Don't forget to contact your local farmers markets for vendor information. This is just a sampling of listings for more show dates visit:
http://festivalnet.com/craft_shows.html
http://www.zapplication.org/shows.phtml


Wire - Part 1

Sterling Silver and goldfilled wire are precious metals and traded as commodities on the stock market. Because of this the metal prices can go up or down. Reasons for this vary from conditions with the world economy usually dictated by the stock market.

Today’s economic climate is making most of us take a serious look at other metals for jewelry making. For most customers where price is of concern, having the look of a precious metal without the price can be a definite plus for selling your items. So my advice get the best of both worlds by offering your designs in both precious and non precious metal.

This is where craft wires come into play. Trust me when I say that not all craft wires are created equal. Some wire brands are difficult to work with and the sterling or gold plating will rub off quickly.

You might see wires branded as Nickel Silver or German Silver..don’t let the name confuse you there is absolutely no silver in these wires, however there is lots of nickel and about 5% OF THE POPULATION IS ALLERGIC TO NICKLE.

To confuse you just a little more, there's also a "German Silver" wire that is also know as "silver-fill". It is 40% sterling, bonded to a copper core…. Just as "gold-fill" is a certain karat of gold bonded to a base metal core.

There is also a "non-tarnishing Sterling Silver wire", Argentium. It is Sterling wire that's been coated with a clear coating and keeps the wire from tarnishing. It’s a little more expensive but you may find the non tarnishing aspect appealing especially for intricate wirework.

There's "gold color" wire, which is usually made from Brass (this can also be found in the coated, non-tarnishing variety).There is also "German Gold" which is 10 parts gold for 40 parts base metal. (Remember Gold-Fill is generally 14 parts gold for 20 parts base metal.

Real Gold wire will be sold in karat form. Gold wire is not plated or filled with added alloys. 24k Gold isn't used for much because it is absolutely to soft. To use Gold it has to be mixed with other metals to make it stronger and harder. What it's mixed with is called an alloy.
• 24k Gold is also called "pure gold" because 100% of it is gold.
• 18k Gold is 18 out of 24 parts gold, so about 3/4ths gold; can also be marked "750", for being 75% gold.

• 14k Gold is 14 out of 24 parts gold, so just over ½ gold; can also be marked "585", for being 58.5% gold.

• 12k Gold is 12 out of 24 parts gold, so ½ gold.

• 10k Gold is 10 out of 24 parts gold, so just under ½ gold; can also be marked "417", for being 41.7% gold.
Now that you’ve gotten some hard core info under your belt, to help you get the look of silver and gold without the price, Pudgy Beads just got in some square and half-round anti tarnish wire ...it’s hot …it’s brand new and it’s definitely got the look and we’ve got it on sale for all your wire wrapping needs.
Stay tuned for part 2

Friday, February 4, 2011

Class Schedule February 2011 - Pudgy News

Basic Beading Workshop 2 - Rosary Wrap - February 12 


You will learn everything there is to know about making and perfecting the rosary wrap. You will perfect this technique by connecting your rosary wraps into chain, making a necklace and a pair of earrings. Class Fee $25.00, Materials not included. (KIT PRICES FROM $15-$30.00). February 12, 1:00pm – 3:00pm.

Intro to Art Metal Clay/PMC - February 12


Create custom pure silver jewelry from moldable clay! Learn about this amazing material while cre­ating rolled bail and stamped pendants. You’ll learn everything from tools and techniques to firing, polishing and oxidizing. An exciting process to create custom pieces in pure silver.  Class Fee $65.00, Materials not included. (February 12, 12:00pm – 3:00pm. 


Silver Fusing - February 19    Class Filled

In this class you will learn to fuse pure silver wire to create a 3 dimensional chain bracelet. This class is a great class to take to be introduced to working with flame and if you are a little timid about tackling soldering. You will leave having mastered the fusing process. Class Fee $60.00, Materials not included. 1pm – 4:pm

Basic WireWrap - February 20


In this class you will learn basic wire wrapping skills. You will use wire to create a structural frame or saddle around a glass or stone cabochon. The frame will securely hold the piece and convert it into a pendant. This class is a must for enhancing your beading repertoire. Class Fee: $35.00, 1:00pm – 3pm Materials not included.


February Articles 

How to shop for Beads and Gems in Tucson or any Gem Show! 


It’s that time of year again…time for the pilgrimage…the annual Tucson Shows. If you have never attended…you should. It is truly a religious experience for any bead or jewelryaholic. For two weeks every year the world and I literally mean the world gathers in Tucson and it becomes a bustling marketplace for buyers and sellers. The gem shows are not a single event but rather a combination of over 75 different shows throughout the city. We participated in the shows there for over 10 years so we know all the in’s and outs. There are shows devoted entirely to gold, diamonds, opals beads and precious and semi-precious stones. One of my favorite shows is African Village, It’s where dealers from all over Africa come and sell their wares. I wrote this article several years ago and it was originally printed in the Gem & Lapidary Catalog. I received so many thanks you’s and it’s been reprinted several times in various journals. Hope this helps you shop in Tucson or at your local gem show.

Tucson can be truly overwhelming for first timers and veterans alike. With every venue (hotel or roadside tent) vying for your dollars. My goal is to perform magic and turn a ten-dollar bill into a hundred…well, at least you’ve come to the right place if you are in search of gems and beads. I’ve come up with a checklist for making your shopping experience a profitable and fun one.

First: MAKE A LIST, yep, that’s right do some homework and make a list…even check it twice for the must haves. If there are things you have to match up beads, gems etc. buy some stretch magic or any stretchy cord and string your samples. Wear this on your wrist as you shop so if you are trying to find coordinating beads you’re actually be wearing your sample, or you can carry them in a clear ziplock. If possible avoid digging and looking for samples inside of a handbag or shopping bag, this may appear suspicious to a seller who may question your motives.

Second: come up with a money amount for your budget. Its not like you have to stick with it to the letter but at least have some idea of what you can afford to spend.

Third: Know what venues have what you’re searching for. Some locations like the Holidome carry a mixed group of vendors (gems, beads, stones, finished jewelry). Some venues are for mainly glass beads. Make sure you check for dates and hours of shows and if there are any special requirements. For wholesale only shows, make sure you bring your license with you. I made miniature copies (credit card size) of mine at a copy place and laminated it so that it stays protected and I can carry it conviently in my wallet.


Fourth: Know what you are buying, compare apples with apples. Carry a small millimeter gauge with you so when you’re shopping for that special bead or stone you’re at least know the size is the same. Know your beads and stones…like is the coral you’re buying dyed or natural. Things like that determine the price. Are the pearls the same quality, are the gems you want faceted or machine cut?


Fifth: Know the difference in grams and ounces. Carry a chart with you if you need to. If one vendor is selling sterling for so much a gram and another is selling by the ounce know how to compute the difference to get the better deal. Buying sterling can be tricky; the only guarantee you have that you are getting what you’re paying for is the reputation of the person selling it to you. Some sterling plated over pewter items is so good that it’s hard for even a professional to tell the difference.


Sixth: Watch out for those 50% off tables and the buy so much get so much free. Remember if it seems too good to be true it probably is. A lot of vendors play the 50% off game, but again make sure you’re up on your prices. The vendor has already marked their prices up double to give you a 50% discount, which is really the original price they wanted to sell the item(s) for. No vendor is giving away inventory. Some vendors say “buy $500 get $500 free. The truth is, the vendor has calculated his or her desired profit margin no matter how much you buy. Don’t scramble to meet someone’s minimum and buy something you don’t really want. If you are a bead buyer, figure out your price per bead. I know for a fact that sometimes the vendor who’s not in the game of discounting can have just a good of a price and some times even better. If a string of beads has 20 beads at $10.00, then each bead costs 50 cents. The 50 per cent off or discount vendor may have the 20 beads at $20.00 and then tell the customer, 50 percent off.


Seventh: If you are purchasing items you know are in abundance at different venues, keep a list of prices, items and booth numbers to make sure you are getting the best prices. Collect cards with booth numbers on the back and keep them in a folder. I carry a miniature stapler to staple them to my notebook. Besides this gives you a permanent record of vendors you may want to contact later.

Eighth: Get a show guide and map out the places you intend on shopping at so that you can cover the most amount of territory with the least effort.
If possible bring a small travel bag with wheels to make carrying your purchases easier.
Above all make this a fun experience. Happy Shopping!!
© This article is copyrighted. Reprint with permission only.


Jewelry Forecast for 2011

Jewelry for 2011 will be stylish, bold and fun. You will see lots of opulent real or faux gemstones. You will see tons of resin and acrylic ones…for the I only wear real gemstone snobs, remember they are light in weight and price. You will see these either alone or in huge dramatic designs and layered too. Your jewelry should definitely make a statement. Don’t be afraid to make massive and drama filled pieces. You will also see antique vintage and retro combinations and Ethnic and Tribal Looks. Innatural stones you will see lots agates, turquoise, onyx and red coral. Pearls will be huge this year whether faux or real. You will see them in tons of shapes including teardrops, huge rounds like shell pearls and biwa.You will also see strong Motifs and textured jewelry so get ready to see things like Snakes, elephants, flowers, birds, bugs, leaves and coins in lots of jewelry.


Heres the breakdown:

Bracelets- Bangles are banging…yes bracelets will be hot this year. The more bracelets you have on your arm the more fashionable you will be. Mix them up thin and thick bangles look nice together and will give you the ultimate look. Big bold bracelets will be the way to go and you will also see cuffs in metals, leather and Lucite studded with crystals studs and charms.


Big Rings – Rings inspired with a vintage retro look will be one of the hottest trends for 2011. You will find them in a variety of colors and styles and made with crystals, pearls, charms and almost any beads. Remember big is better!

Earrings – Hoop earrings are still in. You will see them over the top in size and length. The more glitz the better. Don’t forget chandeliers are still here. The same applies, big and bold and blinging.

Layered Metal necklaces - will continue throughout this year. So gather up your chain, the more elaborate they are the more you’ll fit in. Add some coins or skeleton keys. What you won’t see is lots of precious metal jewelry because of the increased costs. You will see tons of massive lightweight large chain…including aluminum chain.


Color predictions - Colors in 2011 are muted tones like pale grey blues, taupe or faded creams, soft violets, washed out yellows. You will find them combined with more saturated colors such as yellow, violet, purple, red and cerulean blue. Be ready to see lots of Black, Grey and Neutrals.For more in-depth color analysis visit this link http://www.pantone.com/pages/Pantone/Pantone

Happy Valentines Day!
Here’s hoping yours is sweet and beautiful. What would Valentines Day be without hearts? No worries, just in time for the special day or any day we’ve just received some beautiful hand-faceted crystal hearts. I know you haven’t seen this shape before. Preciosa Crystal who is one of the leading crystal makers in Europe makes it. The quality is as good as Swarovski without the high cost. We have limited stock so get in early to get your sparkle on. We are selling these large 30mm brilliant crystals at the unbelievable price of $2.25. Don’t let these get away…exquisite!


We didn’t forget the symbolic red heart either…big bold and just as beautiful, they measure 40mm and we are selling it for $3.00.


Thursday, January 6, 2011

Class Schedule January 2011


Basic Beading workshop 1 - Bracelet $15

This is our basic beginner’s stringing workshop. In this class, you will learn how to choose and attach clasps. You will learn about the different stringing materials and tools required to design with. You will leave with a finished bracelet. Materials not included. (Kits Priced from $7.00- $25.00. Saturday, January 15, 1pm-3pm.

Hammered Flower Bracelet

Students will use professional jeweler’s tools to fabricate and texture a design onto fine silver sheet, which will become the main element of this original bracelet. You will also learn how to cold join/connect all of the main elements together to achieve an incredible design. Materials not included. Class Fee: $65.00 - 4 hours January 15, 12pm-4pm.

Pearl Knotting
    

You will learn how to complete an elegant pearl necklace using the traditional European method of knotting between each pearl, which is an elegant way to protect the pearls or beads from rubbing each other and is a safeguard against loss if the strand breaks. You will master the use of finishing with French Bullion, which is found on most “better” pearl strands and attach the clasp. Materials not included. Class Fee: $25.00 January 22, 1pm-3pm .

 PMC WORKSHOP II
This class is for those who have already taken PMC 1. Taking this class will elevate your knowledge or working with PMC. You will learn how to create and embellish hollow beads and also various methods to set stones into PMC. Class Materials not included. Class Fee $65.00, January 22, 12pm-4pm


   RING TRIO
Triple rings in this class...what's not to love. You'll be wiring your way to beautiful inexpensive rings in a rainbow of colors. Try wearing one on each finger. If you love rings and wire. This class will help you create and master rings & wire. Materials not included. Class Fee: $35.00, January 29 1pm-3pm.


MARKETING 101   Sorry this class is sold out.
This class is by request for people who purchased our bestseller on marketing “You Made It Now Sell It”. We will highlight some points throughout the book and help you perfect your marketing plan. We will focus on determining the right price points of your designs, consignment issues and getting the business you need. Bring your questions and jewelry to get pointers on making your pieces better sellers. Included in this class is our reps guide. You will need to purchase our book or bring it to this seminar if you already have it. For more info on our books visit www.pudgypublishing.com. Class Fee: $75.00 - 4 hours. January 29, 12pm-5pm

January Articles

How to sell your jewelry in 2011

Holiday sales are up and retail spending seems to be on the upswing as reported in the fall of 2010.

If your sales weren’t up, especially during the Christmas season, you are probably wondering if you should continue selling your handmade jewelry.

Your first question is do you need the profit from your sales to maintain your lifestyle or will your lifestyle be unaffected if you have little or no jewelry sales. If you don’t need the profit, then just enjoy the ego- boosting compliments your potential customers give you. If you are like the rest of us, and you really need the income from your jewelry, then perhaps you should put pen to paper and write down the ways you tried to sell your jewelry in 2010.

Did you do a craft show that was unprofitable? Did you sell your jewelry too cheap and not make any profit? Did you try to sell the wrong jewelry to the right customers and vice versa? Did friends persuade you to give jewelry to them for free? It could also be your designs are not “in the ball game”. But you can fix that.

If you don’t have one, you probably need a business plan. Most people think that a business plan should be complicated…it doesn’t have to be. I think having your plan of action in print can help steer you in the right direction.

I have a customer and friend who was desperately trying to sell her jewelry. We set aside a time and I helped her critique her jewelry. She was open to some constructive criticism. The main problem with her jewelry was that she still didn’t have a handle on what kind of direction for her pieces and her designs were a little of this and that…beautiful but no theme or focus.

Deciding what kind of jewelry you want to specialize in is very important. You just can’t put together a few beads and want people to rave about it. Remember there is plenty of competition out there and you’ve got to stand out.

I have a customer who sells plenty of her wire wrapped sea glass jewelry. Her table at shows and her website gives you a clear identity of her style and direction and she sells plenty of pieces at great prices.

If you haven’t found your style, perhaps you should broaden your skills by taking some local classes, classes online or on youtube. I guarantee you that doing so will help you decide fairly quickly what you don’t or do want to do…this is MAJOR.

So open your laptop or get your pen and paper and start to construct your plan for 2011…. Look for part 2 of getting your plan together in the next newsletter.
Need to get a jump start on selling your jewelry, plan to attend our once a year workshop on "Marketing 101" January 29, 12pm-5pm. Spaces sell out quickly so call to reserve your space.


HOW TO DYE PEARLS

I bet you were not aware that you could dye pearls. Yes you absolutely can! You can dye freshwater or faux pearls using either homemade or commercial dyes.

Before You Begin
· Do a color test before you decide on the color. To test your pearl, put one or a few through the dye you intend to use.

· Some colors will lose color when exposed to light. You will find this mostly with blues and violets, which often fade or discolor when exposed to sunlight or ultraviolet light. If you want, you can test the pearls you dyed by exposing them to a few hours of direct sunlight, this should give you an indication of whether the color will fade or change.

· Freshwater (natural) pearls are more porous than faux pearls. Freshwater pearls that have been bleached white usually are more porous than unbleached pearls. .
· You can dye your pearls loose or on a strand. If you keep the pearls on the strand, they will have more color at the edges. FYI most commercially colored pearls are dyed on the strand.
Commercial Dyes
One of the big advantages of using a commercially prepared dye is that they tend to be more colorfast than homemade dyes. The most well know commercial dye is Rit. Start out by following the manufacturer's instructions on the box.

If you like, you can run the dye through a coffee filter before dying your pearls to minimize speckling or you can just make sure the dye is thoroughly mixed.

You can experiment with different dye concentrations, timing or even mixing colors. Write down what you do so that you will be able to duplicate the results again if you want. Be sure to write down the amount of dye used, amount of water and how long you let the pearls sit in the dye.
Natural Dyes
If you feel extremely creative, you can make your own dye. Don’t forget to do a color test to see if the final color is what you want. You can boil the dye into the pearls or you can dye the pearls in cool water. Warm water is necessary to get certain materials to produce deep colors. In general, boiling the dye is a faster process that tends to result in a deeper color.

When experimenting with natural colors, try flowers, fruits or veggies and various herbal teas. If you choose, you can add vinegar, adding vinegar will result in deeper colors.
Although kool-aid is not natural, it can dye pearls too. Mix your package of kool aid with approximately ½ to 1 cup of water. Make sure you stir thoroughly to totally dissolve the kool-aid.

Rinse Your Pearls
Whatever method you use, make sure you rinse your pearls to remove excess dye. I recommend using distilled or filtered water. To make your own distilled water, boil tap water and allow it to cool. Rinse your pearls until the water runs clear. After rinsing, hang or place the pearls on paper towels or a cloth to dry.

Here is a method I use for natural dyes:

1. Place the pearls in the top of a double boiler. Add just enough water to just cover them.
2. Add approximately one teaspoon of vinegar.
3. Add your natural dye. for a more intense color you should add more of your selected material.
4. Bring the water to a boil.
5. Reduce the heat and simmer for 15 minutes (or until the desired color is attained).
6. If you are happy with the color, remove your pearls and rinse.
7. If you are not happy with the deepness of your colored pearls, temporarily remove them from the water and strain it through a coffee filter. Cover the pearls with the filtered dye and let them stay in the dye for several hours. By this point, the color you see is as dark as it will probably get.
8. Rinse the pearls and hang them or lay them on a paper towel until dry.

Here is a list of examples of natural food items and their colors. Some materials must be boiled, Otherwise the other fruits, vegetables, and spices can be used cold.
Lavender - Small amount of Purple Grape JuiceViolet Blossoms plus 2 tsp Lemon JuiceSmall amount of Blueberries
Violet Blue -Violet BlossomsRed Onions Skins (boiled)
Blue - Canned BlueberriesRed Cabbage Leaves (boiled)Purple Grape Juice
Green - Spinach Leaves (boiled)
Yellow/Orange - Orange or Lemon Peels (boiled)Ground Cumin (boiled)Ground Turmeric (boiled)Paprika (boiled)
Brown/Tan - Strong CoffeeInstant Coffee, strong tea
Pink - Beets, PomegranatesCranberries or JuiceRaspberriesRed Grape JuiceJuice from Pickled Beets
Red - Lots of Red Onion Skins (boiled)